Thursday 30 April 2015

This was April: Our favourite Posts 04

Wieder ist ein Monat um und wir präsentieren euch unseren persönlichen Rückblick für April.
Das Thema diesmal war Grunge und – zugegeben – wir können uns kaum davon verabschieden! Zum Glück ist das kommende Thema aber ähnlich spannend und aufregend für uns, wir freuen uns also schon riesig darauf! :)
Aber genug der Vorrede, wir sind ja hier, um den April zu ehren und noch einen Blick auf unsere Machenschaften zu werfen. Also: Vorhang auf für unsere Lieblinge im April.
Was sind eure Favoriten? :)

Again a month has passed and we present you our personal review of April. We have to admit: It's hard for us to say goodbye. But luckily our new topic is similar and also great, so we are looking forward to it! :)
But we don't want to spoil anything, so: Raise the curtain for our favourites of April.
What were yours this month? :)
http://blogdogdaysofsummer.blogspot.co.at/2015/04/diy-pentagram-bra.html
http://blogdogdaysofsummer.blogspot.co.at/2015/04/diy-bulb-vase.htmlDIY and Crafts
Es ist immer schwer, sich für die die Lieblinge des Monats zu entscheiden – vor allem, wenn so viel Herzblut in jedes einzelne geflossen ist! Darum haben wir uns an euren Lieblingen – laut Instagram – orientiert. Der Gewinner war unser Pentagram-BH, den hoffentlich einige von euch nachmachen werden :)
Aber auch unsere Glühbirnenvasen und unsere Lampe aus einem Weinstock waren ein voller Erfolg! Und diese minimalistische Lampe kann mir die Clarissa auch ruhig mal bauen ;)

It's always hard to decide which DIYs you like the most each month. Especially when you like all of them so much and know, how much you poured your heard and soul in each of them. So we decided to show you YOUR favourites (according to Instagram). The winner was our Pentagram-Bra; hopefully many of you try it, too! :)
But also our Bulb Vases and our Grapevine Lamp were successful and Clarissa HAS to build me such a Minimalistic Grunge Lamp, too! ;)
http://blogdogdaysofsummer.blogspot.co.at/2015/04/frozen-green-blueberry-smoothie.html
http://blogdogdaysofsummer.blogspot.co.at/2015/04/vegan-black-rice-risotto.htmlRecipes 
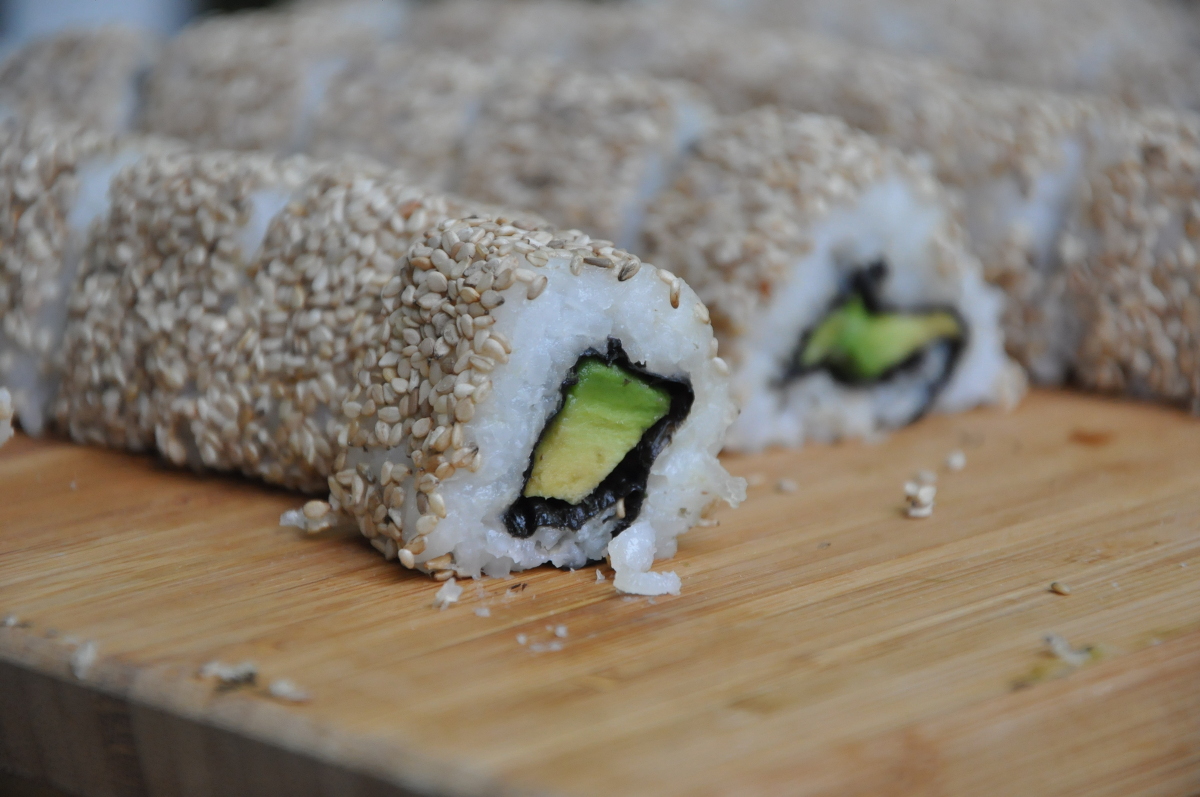
Wir lieben Obst! Und in Smoothies gepresst ist es umso besser. Wenn man dann auch noch berücksichtigt, wie gesund diese Leckerbissen sind... Also unbedingt ausprobieren und unseren Frozen Blueberry Smoothie kosten! Wer danach noch eine Energiebombe braucht, sollte auch unsere Raw-Vegan-Brownie-Energy-Balls und unser Three-Ingredients-Chocolate-Mouse probieren. Oder das Black-Rice-Risotto – ebenfalls 100% vegan. Von unserem ABSOLUTEN LIEBLINGSESSEN ganz zu schweigen.

We litterally adore fruits! Pressed in smoothies they are even better and when you think about how healthy they are... So you just HAVE to give our Frozen Blueberry Smoothie a go! If you need another energy bomb afterwards you should also try our Raw-Vegan-Brownie-Energy-Balls and our Three-Ingredients-Chocolate-Mouse. Or our Black-Rice-Risotto – also 100% vegan. Not to mention our ABSOLUTE FAVOURITE FOOD.
http://blogdogdaysofsummer.blogspot.co.at/2015/04/april-loobook-grunge-smells-like-teen.html
Others
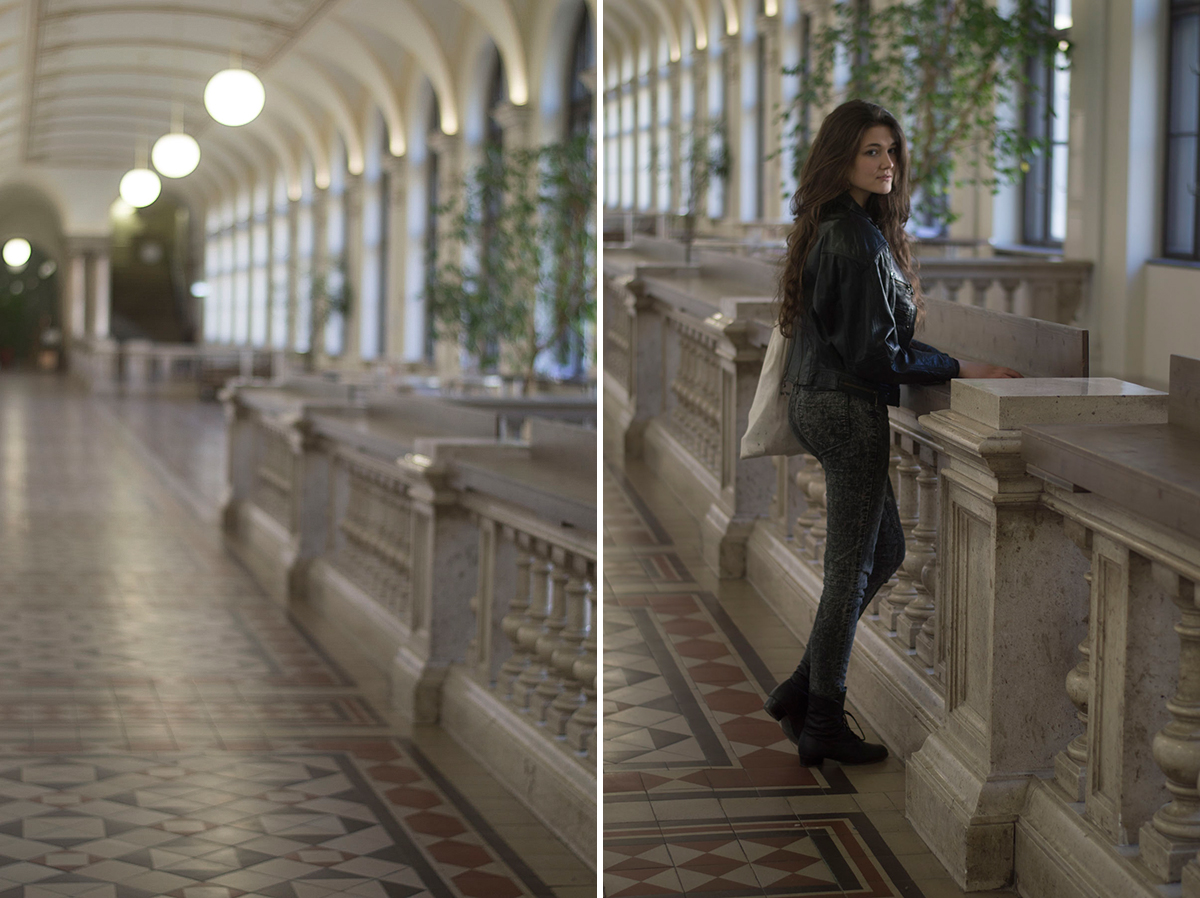
Natürlich gab es auch diesmal wieder ein Lookbook. HIER KLICKEN, um es anzusehen. Schon allein die Location ist einen Blick wert. Mehr darüber könnt ihr in unserem Behind-The-Scenes-Post nachlesen.

Also in March there was a lookbook which you can find HERE. The very location is worth a visit. You can read more about it in our Behind-The-Scenes-Post.
http://blogdogdaysofsummer.blogspot.co.at/2015/04/vintage-outfit-inspiration-grunge-chic.htmlOur favourite shop article 
Zum Schluss noch unsere Lieblingsartikel im April aus unserem Shop. Im Winter mit einer langen, im Sommer mit einer kurzen High-Waist-Hose und schon bist du für alles ausgerüstet. Sieh dir das Outfit HIER an. :)

Last but not least our favourite pieces of our shop in March. In winter with trousers, in summer with shorts and your look is complete! You can find the outfit HERE.

Credits:
Idea, Text: Diana Ranegger | Photos: From previous posts
Read More

Tuesday 28 April 2015

Sesame Avocado Maki

Wer uns kennt, weiß: Wenn es um unsere Lieblingsspeise geht, sind sich Clarissa und ich einig und wir könnten sie ganz ohne Überlegen und Zögern sofort laut herausschreien: Avocadomaki(!!)
So war es nur eine Frage der Zeit, bis dieses Rezept Einzug in unseren Blog fand. Es ist gar nicht so schwer, wie wir uns immer gedacht haben und kann nach Belieben abgeändert werden (wie wäre es mit Mango, Gurke, Karotte statt Avocado?).
Der Kreativität sind wie immer keine Grenzen gesetzt – also: Heute gibt's Maki! :)

Danke übrigens an Kimy für die großartige Hilfe und das Versorgen eines großartigen Abends mit kiloweise Maki – mmmmh :)

Since avocado maki is Clarissa and my favourite food it was only a question of time that this recipe will come on our blog. You can adapt it however you like – take carrots, cucumbers and mango instead of avocado – and enjoy a simple, creative and delicious food! :)

Thanks to Kimy for the great help and the hundred kilos of maki on this wonderful and great evening!
Das brauchst du:

* 2 Tassen Sushireis
* 3 Tassen Wasser
* 5 EL Sushiessig
* Noriblätter
* 2 Avocados
* Sesam

* Bambusmatte
* Frischhaltefolie
* Holzlöffel
* Holzsschüssel

* 2 cups sushi rice
* 3 cups water
* 5 tbsp sushi vinegar
* Nori leaves
* 2 avocados
* Sesame

* Bamboo mat
* Cling film
* Wooden spoon
* Wooden bowl


So wird’s gemacht:

1. Den Reis im Wasser kochen, so lange, bis er bissfest, aber schon leicht klebrig ist. Etwas abkühlen lassen.
2. Danach den Reis in die Holzschüssel geben und mit Sushiessig vermengen. (Nach belieben auch gerne mehr verwenden ;)
3. Die Bambusmatte mit Frischhaltefolie einkleiden.
4. Ein Noriblatt halbieren, auf die Bambusmatte legen, Reis darauf verteilen und mit Sesam bestreuen.
5. Danach das Noriblatt umdrehen und etwas Avocado in die Mitte legen. Nun vorsichtig mithilfe der Bambusmatte einrollen.
6. Etwas kühl stellen und in kleine Röllchen schneiden. Mit dem restlichen Reis wiederholen und dann genießen :)

1. Cook the rice in the water till it is a little bit sticky but still firm to the bite. Let it cool a bit.
2. Now take the rice and put it into your wooden bowl. Add sushi vinegar (if you want, a little bit more than 5 tbsp ;)
3. Put the cling film on the bamboo mat.
4. Take a nori leave, cut it into half and lay it on the bamboo mat.  Put some rice and sesame on it.
5. Turn your nori leave, put a few avocado slices in the middle. Now roll the leave carefully (rice outside, avocado inside).
6. Do this with the rest of the rice. Put it in the fridge for some time, cut it into pieces and enjoy!
Credits: 
Idea: Kimy Bahian | Photos: Clarissa Kober | Text: Diana Ranegger
Read More

Saturday 25 April 2015

DIY Grapevine Lamp

Heute gibt es wieder einen kleinen Tipp für euch: Die liebe Lisa von Mein Feenstaub hat einen Gastpost von uns veröffentlicht. Diesmal verraten wir euch, wie man diese Lampe aus einem alten Weinstock machen kann. Seht selbst – und nebenbei noch ihren liebevoll gestalteten Blog gleich dazu :)

Today we have another little tip for you: Lovely Lisa from Mein Feenstaub featured one of our DIYs as a guest post. This time you learn how to make a lamp out of a old branch of a grapevine. Have a look at the post and on her entire, great blog! :)
http://mein-feenstaub.blogspot.de/2015/04/guest-diy-lampe-aus-weinreben.html
Credits:
Idea, Photos: Clarissa Kober
Read More

Friday 24 April 2015

Gingerbread Energy Balls

Energiekugeln sind die beste Art des Naschens! Süß, lecker und trotzdem gesund und einfach rundum wundervoll! Der perfekte Snack für Zwischendurch – probier es einfach aus!

Energy balls are the best way of nibble! Sweet, tasty but healthy and just wonderful! A great snack for in between – just try it!
What you need:

* 2 Tassen Medjool- oder Softdatteln
* 1 Tasse gemahlene Walnüsse
* 3 EL roher Kakao
* 1 TL Lebkuchengewürz

* Kokosflocken
* Gemahlene Nüsse

* 2 cups medjool or soft dates
* 1 cup grounded walnuts
* 3 tbsp raw cacao
* 1 tsp gingerbread spice mix

* Shredded Coconut
* Grounded nuts

1. Gib die Datteln, Walnüsse, den Kakao und das Lebkuchengewürz in einen Mixer und zerkleinere sie so lange, bis sie eine klebrige, dunkle Masse ergeben. Wenn dein Mixer klein oder nicht stark ist, wirst du die Zutaten auf kleinere Partien aufteilen müssen.
2. Jetzt kleine Kugeln aus dem Teig formen und danach in Kokos oder Nüsse wälzen. Das wird auch verhindern, dass sie zusammenkleben.
3. Die Bällchen zwei bis drei Stunden in den Kühlschrank geben und genießen!

1. Put dates, walnuts, spices and cacao in a blender and blend until you have a sticky, dark mixture. You may have to mix little portions if your blender is a smaller and not so strong one.
2. Now form little balls out of the mixture. Roll them in coconut or nuts so they won't stick together that much. 
3. Put the balls in your fridge and enjoy after two or three hours!
Credits:
Idea, Text, Photos: Diana Ranegger
Read More

Thursday 23 April 2015

Minimalistic Grunge Lamp

Heute gibt es wieder einen Gastpost auf Minnja – geht auf ihren Blog, um unser Tutorial für diese minimalistische Grungelampe zu finden :)

Today we are guest posting on Minnja – go to her blog to see how to make this wonderful minimalistic grunge lamp :)
Credits: 
Idea, Photos: Clarissa Kober
Read More

Tuesday 21 April 2015

DIY Bulb Vase


Da die alten Glühbirnen immer mehr durch LED-Birnen ersetzt werden haben wir uns ein kleines DIY überlegt mit dem ihr eure alten, nicht mehr gebrauchten Birnen schön in Szene setzen könnt. Hier ist unsere DIY Bulb Vase.

Most of the old light bulbs are already replaced by new LED-Bulbs. That's why we figured out a way to reuse your old light bulbs and make them look pretty and stylisch. Here is our DIY Bulb Vase.


Ihr braucht:

*alte Glühbirnen
*dünne Angelschnur
*2 mm Bohrer
*Zange

So wirds gemacht:

1. Entferne die inneren Teile der Glühlampe. Dafür musst du mit einer Zange vorsichtig die Kappe bei der Birne entfernen. Du musst vorsichtig arbeiten jedoch vielleicht manchmal etwas fester drücken damit auch wirklich alles ordentlich herausgeht.

2. Bohre in den Metallteil der Lampe zwei kleine Gegenüberliegende Löcher.

3. Nimm eine dünne Angelschnur und knüpf sie bei den Löcher an.

4. Nun kanns du deine Glühbirne an diesen Schnüren aufhängen.

5. Und schon ist deine neue Vase fertig. Befüll sie nun einfach mit Wasser und gib schöne Pflanzen hinein. Viel Spaß beim Ausprobieren! :)


You need:

*old light bulbs
*thin fishing line
*2 mm drill
*a gripper

How to do it:

1. Remove the old electric parts inside the bulb. Take a gripper for it. You have to work carefully but sometimes push a little harder so really everything gets out.

2. Drill two little holes in the metal part of the bulb.

3. Take your fishing line and knot it to the holes. 

4. Now you can hang your vases. 

5. And your new vase is finishes. Fill it with water and put in some pretty plants. Have fun trying it! :) 


Text, Photos, Idea: Clarissa Kober


Read More

Monday 20 April 2015

Grunge Ice Cubes for your Vodka-drinking Friends

Wenn du noch etwas Wodka vom gestrigen Glasflaschen-Reuse-Projekt übrig hast oder etwas Wasser, das dir allein etwas zu langweilig ist:  Hier eine kleine Idee, wie du deine Getränke ganz einfach spannender machen kannst! Egal, ob du mehr Farbe willst, mehr Geschmack oder mehr – beziehungsweise weniger – Temperatur; dieses Projekt ist perfekt. Und das beste daran: Es ist nicht nur extrem einfach und schnell gemacht, sondern wird auch so lange halten, bis du es verwendest.

If you have some leftover vodka (from the glass-bottle-reuse-project yesterday) or some water that tastes boring: Here a little idea how you can jazz up these things! No matter if you need more colour, more taste or just more – or less – temperature; this project is perfect. And the best thing: It will last until you eat it.
Das brauchst du: 

* Wasser
* Essbare Blüten, Zweige, Beeren

* Water
* Edible Blooms, Branches, Berries

So wird's gemacht: 

1. Wie ihr euch bestimmt vorstellen könnt, ist es extrem einfach. Ihr müsst nur je eine Blüte oder Beere oder was ihr auch immer verwendet in Eiswüfelförmchen geben, mit Wasser auffüllen und gefrieren lassen (am besten über Nacht).
2. Danach könnt ihr euren Wodka mit angenehm harzigem Beigeschmack servieren, eurem Holundersaft einen farbigen Tupfer verleihen oder euer Wasser fruchtig aufpeppen. Einfach und effektvoll!

1. As you can imagine, it's very easy. Just put a bloom or whatever in an ice cube tray and fill it with water. Let it freeze (preferable over night).
2. Now you are able to serve your vodka with a resinous taste, your elder juice with colourful spots or just fruity water. So simple but effective!
Credits: 
Idea, Text, Photos: Diana Ranegger
Read More

Sunday 19 April 2015

How to reuse: Old Glass Bottles


Wir kaufen soweit es geht, soweit das möglich ist, nur Getränke, die in Glasflaschen abgefüllt sind. Manche davon sind leider keine Pfandflaschen, dadurch haben sich bei uns schon kleine Anhäufungen an Flaschen gebildet bei denen wir nicht genau wissen, was wir mit ihnen anfangen sollen. Wenn es euch da ähnlich geht wie uns, haben wir heute eine Idee für euch: How to reuse: Old Glas Bottles. Besonders schön wird dieses Projekt mit Tequila-, oder Rumflaschen, aber auch alte Vodkaflaschen oder Essiggläser eigenen sich gut dafür.

Whenever we can we buy our drinks in glassbottles. Sadly not all of them are recyclable, that's why we came up with an idea how to reuse them. Old alcohol bottels are a good base for this reuse-project beacuse they often have cool prints on them and have this grunge touch, but basically every glass bottle will do the job :)
Dieses Projekt ist ganz einfach, wie bei all unseren anderen How-to-Resuse-Projekten müsst ihr hier nichts nähen, schneiden oder schrauben. Nehmt einfach eine Kerze die dem Durchmesser eures Flaschenhalses entspricht und steckt sie in den Hals. Nun könnt ihr sie anzünden und schon könnt ihr euch an eurem neuen Kerzenständer erfreuen!

This project is like every other of our How-to-reuse-projects incredibly easy and you don't need to have mechanical skills to do it. Simply take a candles which has the same diameter as your bottleneck and put it together. Now you can light it and rejoice in your new, awesome candleholder. Yes, it's really that simple!
Ich hab meinen Kerzenständer auf meine Terrasse gestellt, ich finde er macht sich dort richtig gut! Vor allem am Abend verbreitet er eine super Stimmung und wunderschönes Licht. Viel Spaß beim Ausprobieren!

I put mine on my balcony table, and I have to admit I really love it! Especially on warm summer night this candleholder looks super awesome and spreads a soft and warm light. Have fun and try it out!
Idea, Photos, Text: Clarissa Kober

Read More

Thursday 16 April 2015

Behind the scenes: The naked Island

In the wilderness of Goli Otok - the naked island - on a hot summer day. Only some olive trees and the old walls of ruinous buildings provide shade. The sun shines as if it wants to burn the history of the area and take away all the proofs of years of fear and torment.

After being a bastille in the first world war, Goli continued its cruel history in the 1940s: From 1949 till 1988 the island was a high-security prison where people got jailed for being political opponents. They had to work in quarries and garages and lived in barracks on the island, surrounded by water. There was no way out. 
In 1989 Goli stopped being a prison and got the island of decay and boulder. The only inhabitants have four or six feet and don't talk but baa or chirr. Sometimes tourists come and have a look at the old houses on a bright day but with the sunlight also people bolt from the eerie place. 

We seized the chance to shoot a lookbook at this historical place when we were in Croatia this summer. With a boat and lots of equipment (a suitcase and two bags of clothes, a bag of make-up, two cameras and plenty of other stuff) we started our trip to the deserted isle. The journey itself has already started to be an adventure: There were very, very high waves and after getting out of the storm our boat stopped in the middle of the sea because we had a lack of petrol. So we got towed away and also had to row for quite a long time. Finally on Goli, we searched for a good shooting places.

We tried to combine vintage and grunge while shooting with veneration because of all the things that had happened there. 
Although the island was like a morgue we had funny - but also very uncanny - observers (picture two and three) "that had it in for us" and threatened us more than once. 

Well, enough about the background of our shooting and the place where we took the photos. If you haven't already seen the lookbook, you can find it here.
Cheers! 
Credits:
Idea, Text: Diana Ranegger | Photos: Clarissa Kober and Diana Ranegger
Read More